Battle of Kambula
The Battle of Kambula took place on 29 March 1879, during the Anglo-Zulu War, when a Zulu military force attacked the British camp at Kambula, having routed the mounted element of the British force at the Battle of Hlobane the day before. The battle was a decisive defeat and the Zulu lost their belief in victory. The war ended after the Zulu defeat at the Battle of Ulundi on 4 July 1879.
| Battle of Kambula | |||||||
|---|---|---|---|---|---|---|---|
| Part of the Anglo-Zulu War | |||||||
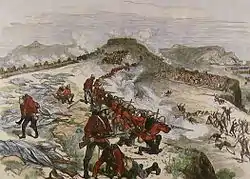
 Battle of Kambula (Melton Prior) | |||||||
| |||||||
| Belligerents | |||||||
|
| Zulu Kingdom | ||||||
| Commanders and leaders | |||||||
| Evelyn Wood | Mnyamana kaNgqengelele[1] | ||||||
| Strength | |||||||
|
2,086[2] 180 African auxiliaries 6 cannon | 20,000 | ||||||
| Casualties and losses | |||||||
|
29 killed 54 wounded | 758–-2,000 killed | ||||||
 Kambula Location within KwaZulu-Natal  Kambula Kambula (South Africa) | |||||||
Prelude
Following the disaster at the Battle of Hlobane on 28 March 1879, the forces of Colonel Evelyn Wood prepared to receive an attack by the entire Zulu impi, of which they had encountered only the leading sections. Soon after dawn of 29 March, Transvaal Rangers rode out to locate the impi, the cattle were put out to graze and after some deliberation, two companies were despatched to collect firewood. By 11:00 a.m. the Rangers had returned with the news that the impi was on the move and was to attack Kambula at noon.[3]
Wood also now received information that the impi was nearly 21,000 men strong, consisting of regiments that had already defeated the British at the Battle of Isandlwana and other battles.[4] Many of the Zulus were armed with rifles taken from the British dead at these battles. Shortly after this, the Zulu impi was sighted 5 mi (8.0 km) away across the plain, coming on due westwards in five columns. The warriors of the impi had not eaten for three days.[5] The woodcutters and cattle were brought back in. Confident that the defences could be manned within a minute and a half of an alarm being sounded, Wood ordered the men to have their dinners.[6]
Cetshwayo responded to pleas from the abaQulusi for aid against the raids of Wood's troops by ordering the main Zulu army to help them. He ordered it not to attack fortified positions but to lure the British troops into the open even if it had to march on the Transvaal to accomplish this but his orders were ignored.[2] The impi moved and Wood initially thought it was advancing on the Transvaal but it halted a few miles south of Kambula and formed up for an attack.[7]
Kambula camp
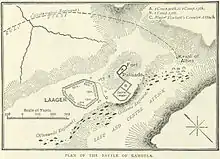
The defences on Kambula consisted of a hexagonal laager formed with wagons that were tightly locked together, and a separate kraal for the cattle, constructed on the edge of the southern face of the ridge. Trenches and earth parapets surrounded both sections and a stone redoubt had been built on a rise just north of the kraal. A palisade blocked the 100 yd (91 m) between the kraal and redoubt, while four 7-pounder guns were positioned between the redoubt and the laager to cover the northern approaches. Two more guns in the redoubt covered the north-east. Two companies were placed in the redoubt; another company occupied the cattle kraal and the remaining infantry manned the laager. The gunners had been told that if the Zulus got in close they were to abandon their guns and make for the laager. Wood's force mustered 121 Royal Artillery and Royal Engineers, 1,238 infantry and 638 mounted men. With headquarters staff, it totalled 2,000 men, of whom 88 were sick in hospital.[8]
Battle

At 12:45 p.m. on 29 March 1879, the tents were struck, reserve ammunition was distributed, and the troops took up their battle stations.[7] As the troops moved to their posts they could see the Zulu right horn, circling north out of British artillery range before halting north-west of the camp. The left horn and centre of the impi continued westwards until they were due south of Kambula. At 1:30 p.m. Lieutenant-Colonel Redvers Henry Buller was ordered with his mounted troops, to sting the right horn into premature attack. The men rode out to within range of the massed Zulus, fired a volley and raced back, closely followed by a great wave of 11,000 Zulu warriors shouting "Don't run away Johnnie! We want to speak to you".[9] As soon as the horsemen had reached Kambula and cleared the field of fire, the British infantry opened fire with support from their four 7-pounders firing shell, which had been firing over the heads of the horsemen and then when the Zulus got closer, engaging them with case (canister shot). A small number of Zulus managed to burst into the laager and were repelled with bayonets, while the bulk of the advance was held at bay by the steady British volley fire and artillery. Some of the Zulu force swung right to come in against the western side of the laager but were met with equally effective volley-fire. At about 2:15 p.m. the Nkobamakosi of right horn drew back to the north-east.[10]
As the right horn made its withdrawal, the left horn and centre comprising the Umbonambi (uMbonambi), Nokene (uNokhenke) and the Umcityu advanced towards a ravine below the redoubt, then attacked from the ravine at about 3:00 p.m. The leading warriors fell to volley fire from the 13th Light Infantry in the south face of the laager and the shrapnel and case shot from the four British guns in the laager and the two in the redoubt.[11] More and more Zulu got into the ravine, about 100 yd (91 m) from the cattle kraal. About forty Zulu riflemen climbed to the lip of the ravine and two parties took over some huts to the east and the rubbish dump to the west, about 400 yd (370 m) either side of the camp. The fire of the Zulu riflemen from the three positions forced most of the infantry in the cattle kraal to retreat into the redoubt and the rest to shelter at the wagons to the rear. Zulu morale rose at the sight of the British retreat, the men in the ravine advanced on the cattle kraal, confronted only by fire from one side of the main laager and soon forced their way into the kraal, fighting hand-to-hand with men of the 1/13th Company. The cattle in the kraal hampered both sides but with Zulu pressure mounting, most of the British troops managed to extricate themselves and pull back to the redoubt, with four killed and seven wounded. Zulu riflemen were now able to open fire from behind the walls of the kraal to give covering fire for more Zulu advancing from the ravine.[11]

At about this time the right horn came on again from the north-east, charging across the north face of the redoubt towards the guns and the eastern sides of the laager. Although attacked on both sides, Wood appreciated that to the south, 5,000 Zulu could shelter in the cattle kraal, only 50 yd (46 m) away, well within charging distance. Wood ordered two companies of the 90th Light Infantry to retake the cattle kraal with a bayonet charge. Led by Major Hackett the men shifted a wagon from the north-east corner of the laager and formed line with bayonets fixed. The British charged across the open ground, forcing the Zulus back over the rim of the ravine. The troops then lined the crest and opened volley fire into the packed warriors. The counter-attack had succeeded perfectly but Hackett's men suddenly found themselves under fire from their right, when Zulu marksmen in the huts and rubbish dump on the left opened fire. Wood ordered the recall, Hackett sounded the 'Retire' and his men returned to the cover of the laager, losing a colour-sergeant, a subaltern and Hackett receiving a blinding head wound; forty-four men were killed or wounded. The Royal Artillery fought their guns in the open and poured round after round directly into the right horn and bombarded the huts with explosive shell and shrapnel to suppress the Zulu riflemen. The rubbish dump was on the other side of the laager and was struck by volley fire which stopped the Zulu reply.[12]
During this period the Umcityu massed in dead ground beyond the ravine and another wagon was pushed aside for a company of the 13th Light Infantry to sortie but the light infantry were forced back by the Zulu. The sight of this withdrawal encouraged the Zulus in the ravine to charge again but the gap in the defences was under the guns in the redoubt and on the ridge. At close range the gunners bombarded the Zulu infantry with case shot, creating a killing zone in front of the laager. The Uncityu was repulsed but rallied as Zulu all round the perimeter attacked continuously. The Nkobamakosi, who had been firing from the rocky area they had retreated to three hours earlier, attacked the redoubt again but were defeated by volley and artillery-fire from behind the wagons and the redoubt. The Zulus charged again and again with unwavering courage but the head of each charge was shot away. More Zulu massed in the ravine but before their attack got going, two companies of the 13th Light Infantry ran to the edge of the ravine and shot down the Zulu below. At about 5:30 p.m. the Zulu survivors began to retire.[13]
Pursuit
As soon as the Zulus began to move eastwards Woods ordered Buller to pursue the Zulu with his 600 horse. The Zulu continued to jog-trot as the horsemen, in three columns, closed up and attacked were harried mercilessly towards Zunguin Nek, mounted troops firing one handed with carbines from the saddle, using their carbines as clubs and spearing them with discarded assegais. The abaQulusi, only recently arrived, ran with the rest of the Zulu force. Captain Cecil D'Arcy of the Frontier Light Horse (FLH) told his troopers to take no prisoners and told them, "no quarter boys and remember yesterday!" referring to the action at Hlobane, where his men had suffered severely.[14] The FLH singled out the abaQulusi, chasing them as far as Hlobane and extracting a savage revenge for their comrades killed the day before. D'Arcy recalled that they, 'butchered the brutes [Zulus] all over the place' while Buller was, 'like a tiger drunk with blood'. Following the cavalry, the British infantry and African auxiliaries combed the field killing any wounded or hiding Zulus. Around 6:30 p.m. as dusk fell, a mist rose around the Zunguin mountains, stopping the pursuit.[15]
Aftermath
Analysis

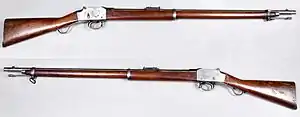
Kambula was the decisive battle of the war, in four hours the British fired 138,000 rounds and 1,077 shells.[13] The British demonstrated that shield and assegai were no match for an entrenched force with artillery and the Martini-Henry rifle. Never again would an impi fight against a prepared position with the ferocity and resolution displayed at Kambula. The Zulu commander, Mnyamana, tried to get the regiments to return to Ulundi but many warriors simply went home and resumed raiding. A few days later, 400 men lifted thirty cattle and 1,500 sheep from the farm of the late Piet Uys.[16] The shock of the defeat contributed to a weakening of the Zulu resolve to maintain armed resistance to the British invasion.[17] In 1995, Ron Lock wrote that Commandant Schermbrucker had written that,
They succumbed to superior weapons and the murderous fire of big guns, but they died like brave men and good soldiers in defence of their chief country; we buried the Zulu dead with full military honours.[18]
and that the Zulu army never recovered from the bloodbath at Kambula. At Ulundi the Zulu fought another battle but without a belief in victory and the price for the British was the defeat at Hlobane the day before Kambula. The British never acknowledged the part played by the colonial horse soldiers.[18] Four days later, about 11,000 Zulu were defeated at the Battle of Gingindlovu and the siege of Eshowe was raised. At the Battle of Ulundi the Zulu charged again and were routed by volley-fire, artillery and Gatling guns.[19]
Casualties
A total of 785 Zulu dead were counted near the camp by burial parties two days after the battle, but their total losses were significantly higher. In 1992, John Laband wrote that Zulu losses are a matter of some debate.[20] In 2003, Ian Knight wrote "785 [bodies] were collected from close by the camp. Many more lay out on the line of retreat where the slaughter had been heaviest... Perhaps as many as 2,000 died" and Frances Colenso (1880) wrote of 1,000 dead.[17][21] Some of the dead had been carried away by friends or relatives but had to be abandoned during the pursuit. Many more warriors retreating from the battle were overtaken and killed by British mounted troops and furthermore, many wounded warriors died fore they could reach home and help, the following day 157 bodies were counted along the line of retreat with reports of more in the distance. The official British estimation in the War Office narrative put the total Zulu losses of dead and wounded at "nearly 2,000". The Zulus thought that their casualties were at least as high or higher than those suffered at Isandlwana. The British suffered casualties of 18 British soldiers killed, 8 officers and 57 men wounded, 11 of whom later died.[22] In 1995 Ron Lock wrote that the morning after the battle, an officer, James Francis, found 800 Zulu dead within an 800 yd (730 m) radius of the camp and that probably another 1,500 Zulu were killed along the line of the pursuit. A pit 200 ft (61 m) long and 10 ft (3.0 m) deep was dug to bury the Zulu dead; the British suffered 83 men killed or wounded.[18]
See also
Footnotes
- Laband 2009, p. 6.
- Knight & Castle 1992, p. 69.
- Lock 1995, pp. 188–190.
- Lock 1995, p. 189.
- Morris 1998, p. 496.
- Lock 1995, p. 190.
- Lock 1995, p. 191.
- Lock 1995, pp. 183–184.
- Lock 1995, pp. 192–194.
- Lock 1995, p. 194.
- Lock 1995, p. 195.
- Lock 1995, pp. 195–196.
- Lock 1995, pp. 196–197.
- Lock 1995, pp. 198–199.
- Lock 1995, pp. 199–200.
- Lock 1995, p. 201.
- Knight 1990, p. 142.
- Lock 1995, p. 200.
- Lock 1995, pp. 201–203.
- Laband 1992, p. 164.
- Colenso 1880, p. 353.
- Laband 1992, pp. 164–165.
References
- Colenso, Frances E. (1880). History of the Zulu War and its Origin. Assisted by Edward Durnford. London: Chapman & Hall. OCLC 251961801.
- David, Saul (February 2009). "The Forgotten Battles of the Zulu War". BBC History Magazine. 10 (2): 26–33. ISSN 1469-8552.
- Knight, Ian; Castle, Ian (1992). Zulu War 1879, Twilight of a Warrior Nation. Oxford: Osprey. ISBN 1-85532-165-3.
- Knight, Ian (1990). Brave Men's Blood, The Epic of the Zulu War, 1879. London: Greenhill Books. ISBN 978-0-947898-95-3.
- Laband, John (2009). Historical Dictionary of the Zulu Wars. Historical Dictionaries of War, Revolution, and Civil Unrest, No. 37. Lanham, MD: Scarecrow Press. ISBN 0-8108-6078-3.
- Laband, John (1992). Kingdom in Crisis: The Zulu Response to the British Invasion of 1879. Manchester: Manchester University Press. ISBN 0-71903-582-1.
- Lock, R. (1995). Blood on the Painted Mountain: Zulu Victory and Defeat, Hlobane and Kambula, 1879. London: Greenhill Books. ISBN 1-85367-201-7.
- Morris, Donald R. (1998). The Washing of the Spears. Boston, Massachusetts: Da Capo Press. ISBN 0-306-80866-8.
Further reading
- Barthorp, Michael (2002). The Zulu War: Isandhlwana to Ulundi. London: Weidenfeld & Nicolson. ISBN 0-304-36270-0.
- Brookes, Edgar H.; Webb, Colin de B. (1965). A History of Natal. Brooklyn: University of Natal Press. ISBN 0-86980-579-7.
- Gump, James O. (1996). The Dust Rose Like Smoke: The Subjugation of the Zulu and the Sioux. Bison books. Lincoln, Nebraska: University of Nebraska Press. ISBN 0-8032-7059-3.
- Knight, Ian (2003). The Anglo-Zulu War. Oxford: Osprey. ISBN 1-84176-612-7.
- Laband, John; Knight, Ian (1996). The Anglo-Zulu War. Stroud: Sutton. ISBN 0-86985-829-7.
- Martineau, John (1895). The Life and Correspondence of Sir Bartle Frere. London: John Murray. OCLC 934940256.
- Raugh, Harold E. Jr. (2011). Anglo-Zulu War 1879: A Selected Bibliography. Lanham, Maryland: Scarecrow Press. ISBN 0-8108-7227-7.
- Spiers, Edward M. (2006). The Scottish Soldier and Empire, 1854–1902. Edinburgh: Edinburgh University Press. ISBN 978-0-7486-2354-9.
- Thompson, Paul Singer (2006). Black Soldiers of the Queen: The Natal Native Contingent in the Anglo-Zulu War. Tuscaloosa, Alabama: University of Alabama Press. ISBN 0-8173-5368-2.