Battle of Sattelberg
The Battle of Sattelberg took place between 17 and 25 November 1943, during the Huon Peninsula campaign of the Second World War. Involving forces from Australia, the United States and Japan, the fighting centred on the Sattelberg mission station which was situated atop a hill about 900 metres (3,000 ft) above sea level, approximately 8 kilometres (5.0 mi) inland from Finschhafen, New Guinea. Following the Australian landing at Scarlet Beach, a large force of Japanese had retreated inland towards Sattelberg. Holding the high ground, the Japanese subsequently threatened the Australian lines of communication as they proceeded to advance south towards Finschhafen, and in order to neutralise this threat, the Australian 26th Brigade was tasked with capturing the mission. Over the course of 10 days they advanced west from Jivevaneng up the southern approaches to the mission, reducing the Japanese position with armour, artillery and air support, before the Japanese finally abandoned Sattelberg and withdrew north to Wareo, having suffered heavy casualties and running low on supplies.
| Battle of Sattelberg | |||||||
|---|---|---|---|---|---|---|---|
| Part of the Pacific theatre of the Second World War | |||||||
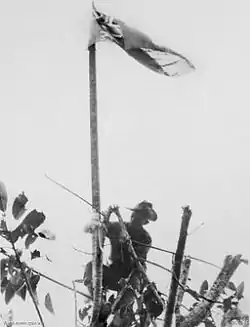 Sergeant Tom Derrick raising the Australian flag over Sattelberg mission | |||||||
| |||||||
| Belligerents | |||||||
|
|
| ||||||
| Commanders and leaders | |||||||
|
|
| ||||||
| Units involved | |||||||
| |||||||
| Strength | |||||||
| ~3,500 men | ~2,800 men | ||||||
| Casualties and losses | |||||||
| 49 men killed, 118 wounded | Heavy | ||||||
Background
Following the fall of Lae in September 1943,[2] the Australians continued their advance north along the New Guinea coast towards the Huon Peninsula, with the aim of securing Finschhafen, where large scale air and naval facilities could be constructed for operations that were planned against New Britain.[3][4] On 22 September 1943, less than a week after Lae had been captured, Brigadier Victor Windeyer's Australian 20th Brigade was detached from the 9th Division by Major General George Wootten, the divisional commander, and landed at Scarlet Beach (north of Siki Cove), to the east of Katika and about 10 kilometres (6.2 mi) to the north of Finschhafen.[5]
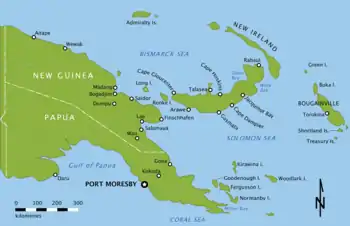
The landing was only lightly opposed, and the Australians began to advance south towards Katika where Japanese resistance was stronger, but was nevertheless overcome by the early afternoon. As the 20th Brigade advanced south towards their objective at Finschhafen, intelligence indicated that the Japanese were moving to the high ground to the west at Sattelberg, which was situated about 900 metres (3,000 ft) above sea level.[5][6] Captured documents showed that three infantry battalions were being concentrated at an old Lutheran mission station that had been established at Sattelberg in the 19th century during the German colonial administration of the area.[7][8] Concerned for the security of his lines of communication due to the presence of Japanese on his flank, the Australian brigade commander adopted more cautious tactics, while reinforcements were called for.[5] Heavy fighting ensued, but Finschhafen fell to the Australians on 2 October.[9]
Following this, the 9th Division was tasked with advancing towards Sio, further around the coast on the northern side of the Huon Peninsula.[10] The Japanese in the area around Finschhafen were growing in strength, however, as a large number of the 4,000 to 5,000 men that had garrisoned Finschhafen had managed to escape inland, while the rest of the 20th Division, under the command of Lieutenant General Shigeru Katagiri,[11] was being moved from Bogadjim, south of Madang, to provide reinforcements.[7][10] Wootten considered that the threat posed by this force meant that Sattelberg would have to be captured before the 9th Division could undertake its advance towards Sio.[10]
Prelude
Advance on Finschhafen
During the advance on Finschhafen, a company from the 2/17th Battalion, which had been tasked with securing the beachhead and the flank, had been sent to Sattelberg but had been unable to occupy it due to the strength of the Japanese force already there.[12] As captured orders had revealed Japanese plans to breakthrough to the coast, it was decided to place the company into a blocking position east of Sattelberg along the coast road around Jivevaneng.[9] In this position, from 25 September onwards they were subjected to a number of attacks as they attempted to deflect attacks by the Japanese 3rd Battalion, 80th Infantry Regiment, which were aimed at breaking through to Heldsbach Plantation, directly south of the beachhead at Siki Cove.[13] On 30 September the 2/17th were replaced by a company from the 2/43rd Battalion,[9] and over the next couple of days, a whole battalion of Japanese surrounded the position and attacked it eight times. Four attempts by the Australians to relieve the company failed,[12] before an attack on Kumawa by the 2/17th Battalion on 5 October cut the Japanese supply lines and provoked a strong counterattack, which subsequently drew pressure off the beleaguered company,[7] and enabled it to be relieved on 7 October.[14] As the threat of Japanese counterattack grew, the 24th Brigade landed at Langemak Bay on 10 October to reinforce the 20th Brigade. The following day, Wootten was able to establish his divisional headquarters at Finschhafen,[10] and preparations began for the Australians to attack the Japanese force around Sattelberg.[7]
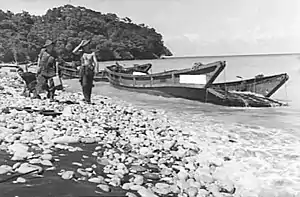
During this time, the Japanese were also planning an offensive. On 10 October, the Japanese 20th Division's commander, Katagiri, arrived at Sattelberg having trekked overland from Sio. After taking over operational control of the forces there, on 12 October he issued orders for an attack to commence on 16 October.[11] This attack was conceptualised as consisting of two infantry regiments, the 79th and 80th, supported by three artillery batteries from the 26th Field Artillery Regiment, a company from the 20th Engineer Regiment and the divisional signals unit.[15] As a part of this offensive, the 80th Infantry Regiment would continue to make attacks on the Australian forces around Jivevaneng, while the 79th Infantry Regiment would drive towards Katika and attempt to break through to the coast to attack the beachhead at Scarlet Beach, where a seaborne assault would be made concurrently by 70 men from the Sugino Craft Raiding Unit.[16]
The Australians had learned about Katagiri's plans and as a result the 9th Division commander, Wootten, decided to put off his own offensive plans while the Japanese attack was dealt with.[7] It came in the early hours of 17 October, and over the course of the following week heavy fighting ensued around Katika and Jivevaneng. Forewarned, the Australians were able to check these attacks with assistance from American support units, and by the time that the Japanese called off their offensive on 25 October, the Japanese 20th Division had suffered 352 men killed and 564 wounded,[17] while the Australians had suffered 228 casualties.[18] It was during the early stages of this fighting that an American soldier, Private Nathan Van Noy, from the 532nd Engineer Boat and Shore Regiment, performed the deeds that resulted in him being posthumously awarded the Medal of Honor.[19]
Japanese preparations
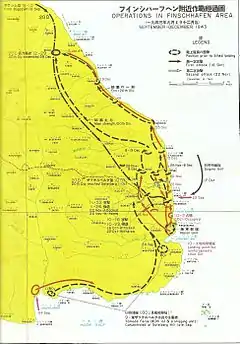
With the 79th Infantry Regiment having lost around 50% of its strength and with ammunition and food running low (by the end of the month, they had been reduced to quarter rations), the Japanese divisional commander, Katagiri, made the decision to call off the attack in order to pull back from Jivevaneng and Katika and regroup on the higher ground further west around the mission. This order was passed on the morning of 24 October,[17] and by the morning of 27 October the Japanese 20th Division's subunits had managed to regroup to the east of Sattelberg.[20] Following this, Katagiri received orders from the 18th Army commander, General Hatazō Adachi, who delivered them personally at Sattelberg, for the 20th Division to prepare to hold the mission and to engage in offensive operations in the immediate vicinity.[20]
As a part of this plan, Katagiri decided that he would use the 80th Infantry Regiment to defend Sattelberg, while the 79th would concentrate in the Nongora area with the intention of launching a counter-attack upon the Australian forces advancing from Katika, near the Song River on 25 November.[21][22] Around Sattelberg, the 80th Infantry Regiment was deployed in five key locations. Three companies from the regiment's 2nd Battalion established a position at the 2,200 feature (known as "Saheki-yama" to the Japanese), and another three companies from the 3rd Battalion were positioned astride the Sattelberg road at "Miyake-dai", or the 2,600 feature. Another two companies were positioned to the south of the main position at "Yamada-yama", while the remainder of the regiment was entrenched around the mission itself—the "Kanshi-yama"—where they had established a formidable "fortress", and around the Japanese commander's "keep" which was positioned on the 3,200 feature, known as the "Katagiri-yama".[23][24] The strength of these forces was estimated by the Australian commander, Wootten, to be around 2,800 men in the immediate vicinity of Sattelberg mission, with a further 2,400 around Nongora and another 1,000 to the north at Gusika. These estimates were confirmed after the fighting.[22]
The Japanese defenders were supported by the 4th Air Army, with fighter and bomber aircraft from the 6th and 7th Air Divisions flying close support missions against Australian artillery positions, carrying out bombing operations around the Finschhafen area, and dropping supplies by air around Sattelberg and Wareo throughout October.[20]
Allied preparations
Prior to the attack on Sattelberg, the Australians needed reinforcements. Although initially the Allied higher commanders were reluctant to provide these,[6] on 25 October the Militia 4th Brigade was detached from the 5th Division and placed under the operational control of the 9th Division. These troops were subsequently used in a defensive role around the beachhead to free up the rest of the 9th Division for the offensive operations.[18][25] The 2/43rd Battalion, from the 24th Brigade, was also brought up on 30 September, ahead of the rest of the brigade which arrived later in October.[6] Nevertheless, by the end of September, the Allies perceived the situation around Finschhafen to be "reasonably secure", and American engineer and construction units, including the 808th Engineer Aviation Battalion,[26] started to arrive in October. By December they had begun work constructing an airfield and other base facilities around Dreger Harbour.[26][27] Following this, Wootten began finalising his plans for assaulting Sattelberg. Because the 20th Brigade had borne the brunt of the fighting following the landing in September, the 26th Brigade, which had landed at Langemak Bay on the night of 20 October under Brigadier David Whitehead, was chosen to spearhead the attack.[4] At the same time, the 20th and 24th Brigades, operating in the central and northern sectors, would continue patrolling operations in order to keep the Japanese off balance.[4][28]

Support for the 26th Brigade's attack would be provided by divisional assets,[29] including Matilda tanks from 'C' Squadron, 1st Tank Battalion,[27] whose presence the Australians took great lengths to keep secret,[30] artillery from the 2/12th Field Regiment and later (after it was found that the 25-pdrs could not be transported up the Sattelberg Road), the 2nd Mountain Battery,[31] and support-by-fire from the 2/2nd Machine Gun Battalion.[32] The 2/13th Field Company supplied engineer detachments to each battalion,[33] while air assets were provided by the United States 5th Air Force and No. 4 Squadron, Royal Australian Air Force, which was an Army co-operation squadron that was equipped with Boomerangs and Wirraways, and provided aerial observation in support of artillery operations.[34] Vengeance dive bombers from No. 24 Squadron, RAAF also provided support,[35] while Japanese supply lines were disrupted by Allied aircraft and PT boats.[36]
Supplies for the operation were landed by American landing craft from the 532nd Engineer Boat and Shore Regiment and brought forward using vehicles or carried by local porters. They were then "dumped" around Jivevaneng and Kumawa, where they could be distributed to individual battalions.[36][37] However, the heavy rain that had fallen at the end of October hampered the buildup of stores and consequently delayed Australian preparations. As a result, their plans were not finalised until 15 November. At this time, Whitehead began issuing his orders.[4] The concept of operations called for the capture of the 2,200 feature—so called by the Australians because that was its height in feet—first, before a subsequent westward advance to the mission. The 2/48th Battalion would advance west from Jivevaneng along the Sattelberg road supported by tanks from the 1st Tank Battalion, while the 2/24th Battalion would advance north-west across Siki Creek and capture the 2,200 feature.[4] The 2/23rd Battalion, which would hand over its defensive duties to the 2/4th Commando Squadron,[38] would start further south from Kumawa, protecting the left flank, and after paralleling the Sattelberg road, they would marry up with the 2/48th at a position called "Steeple Tree Hill", or the 2,600 feature, by the Australians ("Miyake-dai" to the Japanese), where it was planned to halt for resupply and re-appreciation before undertaking the final attack.[4][39] It was decided that tanks, which would provide direct fire support for use against the Japanese bunker systems that were believed to be around Sattelberg, would only be employed along the Sattelberg road, as considerable engineer support was required to move the Matildas into position in the closed terrain.[39]
Battle
Initial Australian attack
On 17 November, fighting for the main position around Sattelberg commenced.[23] The previous night, in order to prepare for the attack on the 2200 feature, the 2/48th Battalion captured Green Ridge, a small but important feature that dominated the Sattelberg road.[40] The capture of the ridge secured a start line forward of Jivevaneng for Whitehead's 26th Brigade to launch the first stage of their attack upon Sattelberg.[22] The following day, the 2/48th Battalion handed over responsibility for the defence of the ridge to a company from the 2/23rd Battalion,[41] and the attack commenced[22] amidst heavy supporting artillery and machine-gun fire.[42] In response, the Japanese artillery from Sattelberg fired a limited barrage onto the Australians on Green Ridge.[42]
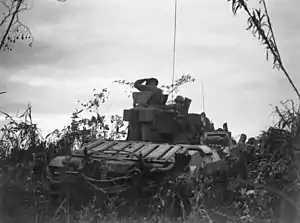
The terrain upon which the Australians advanced hampered their movement considerably. Consisting mainly of steep "razor-back" ridges and thick jungle which restricted the tactics that Whitehead could employ, the 26th Brigade mainly employed infiltration tactics, advancing on "narrow fronts" using columns of troops consisting of an infantry company forward, followed by a troop of tanks with an engineer section in support.[22] Initially the Japanese were surprised by the presence of the Matilda tanks as their noise had been masked by the artillery and rocket barrage,[42] and a number of positions were abandoned by Japanese soldiers who were put to flight upon seeing the tanks,[43] however, as the day progressed the opposition stiffened and the defenders recovered after the initial shock.[22] Progress subsequently became very slow, and as the 2/48th Battalion approached "Coconut Ridge" (designated Highland 5 by the Japanese) at around midday,[44] one of the Matildas was disabled when it lost a track to an improvised explosive device which had been placed under the road by the defending Japanese. With the tanks isolated from their infantry support, a small Japanese team advanced from cover to attack a second tank which had come up to support the first, and taking the machine gunner by surprise, they placed an explosive charge in front of it. Although the resulting explosion did not knock the tank out of action, it trapped its crew inside for the rest of the day.[45]
Firing upon the Australians with machine-guns, mortars and grenades, the Japanese defenders upon Coconut Ridge held up the advance. Throughout the rest of the day, the 2/48th Battalion undertook a series of flanking attacks in which at least 80 Japanese were killed, however by nightfall the Japanese still held the ridge, and the 2/48th Battalion withdrew to a nearby knoll to reorganise, having suffered six killed and 26 wounded.[46][47] Elsewhere, the other two Australian battalions had also found the going slow: the 2/24th had dug in east of the 2200 feature, while the 2/23rd had only managed to advance about half the expected distance.[47][48]
The Japanese abandoned Coconut Ridge that night, while in the morning the Australians brought up three replacement tanks. At around 7:00 am, an Australian patrol scouted the ridge and an hour later a platoon attack was put in, confirming that the defenders had gone. As battlefield clearance operations got underway, the tanks that had been disabled the day before were also repaired, bringing the total number of Matildas available to seven. In the early afternoon, the advance was resumed, however the Australians only managed to progress a further 250 yards (230 m) before they were halted by stiff opposition from Japanese armed with 37 mm anti-tank guns. A number of these pieces were destroyed and at least 40 Japanese were killed or wounded, but Japanese snipers inflicted a number of casualties upon the Australians, and although none were fatal it prevented any further gains as the 2/48th spent most of the day hunting the snipers in the trees.[48] Elsewhere, in front of the 2,200 feature and on the southern flank, only limited progress was made by the Australians,[44] who suffered a number of casualties from Japanese 75 mm mountain guns before these were silenced by a bombardment by the 2/12th Field Regiment.[49] At dusk, the Australians dug in less than 30 yards (27 m) from the Japanese defence line and sporadic fighting continued throughout the night.[33]
That night, Wootten decided to take stock of the slow progress along the southern and central routes.[50] Based on captured documents, Australian intelligence reports placed the number of Japanese troops around the mission at about 2,000 men. These men were believed to be from the 80th Infantry Regiment, which the Australians felt was close to exhaustion and unlikely to be able to withstand any further pressure.[28] As a result of this information, Wootten decided to change the concept of operations.[50] Although the 2/24th Battalion's attack on the 2,200 feature had originally been intended to serve as a holding action, the lack of progress by the 2/48th and 2/23rd encouraged Wootten to order the 26th Brigade's commander, Whitehead, to concentrate his efforts upon the 2,200 feature, turning the drive on Sattelberg into a "double-pronged" attack, with the 2/24th also attempting to break through to Sattelberg.[50][51]
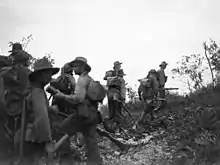
The following day, 19 November, the Australians came up against a series of prepared defences which further slowed their progress. Throughout the night the Japanese had dug a number of anti-tank ditches, about 6 feet (1.8 m) wide and 4 feet (1.2 m) deep, which Australian engineers had to fill before the tanks could continue.[33][51] Progress was made, however, and amidst hand-to-hand fighting troops from the 2/48th managed to seize part of the 2,600 feature (Steeple Tree Hill), after engineers under the command of Lieutenant (later Captain) Augustus Spry, helped clear the way through the use of two fougasses that were fashioned out of 4-gallon drums filled with petrol, which were exploded in order to stun the Japanese and provide a smoke screen while the infantry attacked.[52] The Japanese launched a counter-attack as dusk fell, but this was repelled with heavy losses: the Australians had 20 men killed or wounded, while the Japanese left behind 46 killed, as well as a number of machine-guns and mortars, as they withdrew from the position.[52] The 2/23rd Battalion to the south, up against the same defensive system that was delaying the 2/48th, was also held up further, while on the northern route, the 2/24th found the 2,200 feature unoccupied, but was unable to proceed further after they came under heavy machine-gun and artillery fire.[53]
The fourth day of the assault, 20 November, brought no forward movement for the Australians at the 2,200 feature[54] as the 80th Infantry Regiment's 2nd Battalion fought tenaciously to prevent the 2/24th from moving forward.[55] Nevertheless, it was a different story for the Australians on the main road as the 3rd Battalion, 80th Infantry Regiment was forced back towards "Point 7".[55] At the start of the day, the Australian 2/48th Battalion had only been able to advance a further 250 yards (230 m) before their progress was held up by thick scrub which delayed their tank support,[56] however, to the south, the 2/23rd Battalion moved up the southern slope of Steeple Tree Hill and over the course of the afternoon gradually forced the defenders back. The 2/48th made slow progress but by 6:35 pm they reported that they had reached the summit of the hill and as night fell, the two Australian battalions were separated by about 300 yards (270 m).[57] Caught between two groups of Australians, during the course of the night the two Japanese companies that had been holding the position abandoned it, and fell back towards the main defensive position at Sattelberg.[58]
Japanese counter-attack
For the Japanese, the supply situation around Sattelberg was worsening. Although some supplies were successfully air dropped, the defenders were reduced to consuming only a third of the standard daily ration and Katagiri's supply of artillery shells was very low, despite adherence to strict fire discipline.[24] Given the desperate supply situation, which was made all the worse when the 24th Brigade cut the track between Gusika and Wareo,[59] the Japanese 18th Army commander, Adachi, gave Katagiri approval to withdraw from Sattelberg after 20 November.[55] Katagiri subsequently ordered Colonel Sadahiko Miyake, the commander of the 80th Infantry Regiment, to inflict as many casualties upon the Australians as possible and then begin a progressive withdrawal to Wareo.[24] Nevertheless, Katagiri was determined to launch a counterattack further to the north-east. When formulating his defence plans in October, he had originally intended to launch an attack from Nongora with the 79th Infantry Regiment on 25 November, however, with the Australians advancing steadily towards the main position at Sattelberg, Katagiri decided to bring this forward in order to take some of the pressure off the troops defending the mission.[60] After moving into position on 21 November, the attack was launched the following day.[61]
Wootten had predicted this, based upon documents that had been captured by the Australians, and Brigadier Selwyn Porter's 24th Brigade had thoroughly prepared for the onslaught.[62] The 79th Infantry Regiment crossed the Song River and attacked Scarlet Beach from the west, while the 2nd Battalion, 238th Infantry Regiment, which had been detached from the 41st Division, attacked south from Gusika.[62] By using infiltration tactics the Japanese skirted around the lead elements of the 24th Brigade in an attack that was intended to roll up the Australian rear elements, however, the Australians in turn attacked the flanks of the Japanese units, mauling their supply columns and inflicting heavy casualties upon them. This had the effect of squeezing the strength out of the Japanese counterattack and forcing them into undertaking piecemeal attacks which were dealt with by the Australians with relative ease.[63] As a result, although the fighting around Scarlet Beach continued until 28 November when the Japanese units that had been involved were withdrawn towards Wareo,[64] it did not have the urgency to affect the 26th Brigade's advance on Sattelberg[18] and was largely broken up by 23 November.[65]
Australian attack resumed
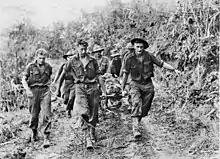
After being forced off Steeple Tree Hill, Miyake, commanding the main Japanese defensive unit, the 80th Infantry Regiment, decided to concentrate his defence upon the saddle at "Point 10" which was positioned to the west of the 2,200 feature, at Sattelberg itself and on the 3,200 feature to the north-west.[55] An intense five-day Allied aerial bombardment, which had begun on 19 November, had destroyed the majority of the Japanese guns around Sattelberg, and the ammunition and food situation had become critical, despite the arrival of several tonnes of rice at Wareo the day before.[61]
Throughout 21 November, there was a lull in the battle as the Australians paused for resupply.[55] However, by the end of the day Whitehead had made good his supply situation and the advance resumed the following day.[62] In an effort to find the best possible route, the Australians sent out small reconnaissance patrols and based on the intelligence they gained Whitehead produced a new set of orders prior to stepping off on 22 November.[66] The 2/48th continued to advance along the road; the 2/23rd were to break track beyond Steeple Tree Hill at a location dubbed "Turn-Off Corner" and advance around behind the mission, to attack the 3,200 feature, while the 2/24th Battalion were to advance west, attempting to bypass the main Japanese positions in front of the 2,200 feature via an adjacent saddle to assist in the capture of Sattelberg, while also sending a detachment further north to secure Palanko.[63][66]
Following the fall of Steeple Tree Hill, the Japanese were less inclined to engage the Australian forces, nevertheless the advance continued to be frustratingly slow for the Australian commanders.[67] The terrain over which the final part of the advance was undertaken was particularly taxing on the troops involved. Many of the slopes up which they were required to advance had gradients of at least 45 degrees, which meant that even reasonably short distances took considerable time[68] To make matters worse, near the junction of the Siki Creek, a landslide caused by the Allied bombing, coupled with a number of land mines that the Japanese had planted, blocked the main road to Sattelberg, meaning that the soldiers from the 2/48th would have to make the final attack on Sattelberg without armoured support.[69] In an effort to counter this problem, Whitehead determined that the tanks would be re-allocated to the 2/23rd, in the hope that a new route would be opened up by the engineers.[70]
Although he was being pressured by the divisional commander to increase the speed of the advance, Whitehead was said to be reasonably happy with the progress being made by the 2/48th along the central route, although he had misgivings about the performance of the 2/23rd on the left and the 2/24th on the right.[66] To some extent, the failure of the 2/24th to take the 2,200 feature could be attributed to the importance which the Japanese commander, Katagiri, placed upon its defence,[66] however, Whitehead believed that the battalion's commanding officer, Lieutenant Colonel Andrew Gillespie, was procrastinating and being overly cautious in his tactics. Nevertheless, it was later realised that the terrain which the 2/24th faced was more formidable than first thought, and that in order for the battalion to make progress, they too, like the 2/48th, would need tanks. Some attempt was made by the Australians to bring these up from the rear areas, but ultimately the fighting around Sattelberg came to an end before this could be effected.[71] On the brigade's left, south of the main route, the pace of the 2/23rd's advance had also caused Whitehead some concern. Indeed, Whitehead went as far to express this to the 2/23rd's commanding officer, Lieutenant Colonel Frederick Tucker, who pointed out that his lack of progress had been caused by the large number of tasks that the battalion had been assigned, namely the competing demands to secure the flank while attempting to move quickly through broken country in order to make its scheduled rendezvous with the 2/48th.[71]
On 23 November, Allied bombers attacked the fortress at Sattelberg, as well as defensive positions around Kumawa. The 2/48th, nearing their objective, cautiously began to probe the outer positions, while to the north, three companies from the 2/24th managed to reach the saddle that lay below the north-eastern approach to the mission, although there was still uncertainty as to whether or not the Japanese had withdrawn from the 2,200 feature. To the south-west, the 2/23rd began skirting north around the main positions at Sattelberg, making for the 3,200 feature. After they had struck Turn-Off Corner, the infantry from the 2/23rd were accompanied by engineers from the 2/13th Field Company, who were tasked with laying down a makeshift road, over which the tanks that had been re-allocated to the 2/23rd would traverse.[70]
Final assault
By 24 November the Australians were within striking distance of the mission atop the summit.[72] A reconnaissance patrol the previous evening had provided the Australian commander with the idea to send a company from the 2/48th over the Siki Creek and attack the mission from the south-east up a steep escarpment that was covered in thick kunai grass, which offered an attacking force a degree of concealment. A red roofed hut stood at the point where the attack was aimed. This was about 300 metres (330 yd) below the Lutheran church that formed the main part of the mission. Around the hut, the Japanese had constructed a number of reinforced defensive positions and although they had not been damaged by the numerous aerial attacks that had been launched by the Allies during the previous week, it was believed that because the approach was so difficult, it might be lightly defended.[70]
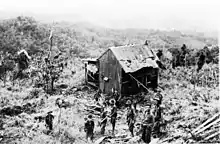
During the morning, while a diversionary attack was made by the 2/23rd Battalion,[73] and patrols from the 2/24th to the north attempted to break through,[73] a company from the 2/48th, under the command of Captain Deane Hill, attempted to reach the summit at Sattelberg. Two platoons launched attacks during the early afternoon, but were beaten back by the twenty Japanese defenders that were dug in around the spur.[74] Late in the afternoon, a third platoon, 11 Platoon, under the command of Sergeant (later Lieutenant) Tom Derrick, attempted another attack from further to the right of the position but it too was checked by machine-gun fire and lobbed grenades. As the light began to fade, Derrick reported his lack of progress to his company commander and was subsequently ordered to withdraw, so that another attempt could be made in the morning.[75] Derrick's response to this order was to obfuscate, however, and instead of withdrawing, he subsequently led his platoon forward, attacking 10 Japanese positions with grenades as his men supported him with Bren and Owen submachine-gun fire.[72]
After stopping about 100 yards (91 m) from the summit, Derrick's platoon continued to hold their position through the night. Elsewhere, the 2/24th Battalion reported that they were just below the crest of the 2,200 feature, the last Japanese defensive position to the north, and that they would capture it the following morning, before proceeding on to their secondary objective at Palanko.[76] Believing that the key to taking Sattelberg lay in having the 2/24th in a position to support the 2/48th's final attack, Whitehead pressured for the tanks to get up to the 2/24th as soon as possible.[76]
The following morning, at first light, spurred on by the example provided by 11 Platoon, reinforcements from the 2/48th came up to complete the capture of Sattelberg. Just after dawn, a heavy artillery barrage was brought down on the summit by Australian artillery in preparation for the final attack. At 8:25 am patrols were sent out from 'B' Company, 2/48th Battalion, and they subsequently reported that the Japanese had abandoned the position sometime during the night.[68] Indeed, it was later established that Miyake, who had been in command of the troops gathered around the mission and had been given permission to abandon Sattelberg if the situation became untenable, had decided to withdraw from the position soon after Derrick's attack.[75]
Fifty minutes later, the lead elements of the 2/48th Battalion entered the main mission complex, which was found to be quite badly damaged.[31] Finally, at 10:00 am, upon the insistence of the 2/48th Battalion's commanding officer, Lieutenant Colonel Robert Ainslie, Derrick was given the honour of raising the Australian flag over the mission, signifying that the battle had come to an end.[72] Shortly after this, the tanks finally reached the 2/24th Battalion, and the 2,200 feature was also captured. Upon completion of the flag-raising ceremony, a company from the 2/48th moved on to the 3,200 feature, which had also been abandoned, while further to the west, the 2/23rd, along with the 2/4th Commando Squadron cleared Mararuo and in the process found evidence that the Japanese had withdrawn towards Wareo.[31]
Aftermath
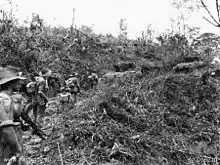
During the fighting around Sattelberg, the Australians lost 49 men killed and a further 118 wounded. In the circumstances, this was considered to be light.[18][77] Japanese casualties are unknown, but are believed to have been "heavy": a large number of Japanese bodies were found during the advance on Sattelberg, while another 59 were counted around the 2/24th's position on the 2200 feature, and captured documents indicated that the defenders had been close to starvation.[55] A large quantity of weapons were also captured, including two 75 mm artillery pieces, three 37 mm anti-tank guns and 18 Type 92 Heavy Machine Guns (colloquially known as "Woodpeckers"), as well as a considerable number of mortars, light machine-guns and assorted small arms.[77][78]
Following the capture of Sattelberg on 25 November, the 26th Brigade continued to advance to the north. Further fighting ensued as they pushed on over difficult terrain to Wareo, where they arrived on 8 December. After the Australians took Wareo, the Japanese began to fall back to Sio,[79] where subsequent fighting took place throughout December 1943 and early 1944.[80]
For his actions during the final assault on the mission, Derrick was awarded the Victoria Cross—his nation's highest military decoration. Derrick was the fourth soldier from the 2/48th Battalion to receive the award; by the end of the hostilities the 2/48th had the distinction of being the most highly decorated Australian Army unit of the Second World War.[24] The following Australian units received the battle honour of "Sattelberg" for their involvement in the battle: 1st Tank Battalion, 2/23rd Battalion, 2/24th Battalion, 2/48th Battalion and the 2/2nd Machine Gun Battalion.[1]
Notes
- Maitland 1999, p. 143
- Coulthard-Clark 1998, p. 241
- Johnston 2002, p. 153
- Keogh 1965, p. 329
- Coulthard-Clark 1998, p. 242
- Thompson 2008, p. 379
- Coulthard-Clark 1998, p. 244
- Coates 1999, pp. 213 and 227
- Dexter 1961, p. 501
- Johnston 2002, p. 159
- Tanaka 1980, p. 181
- Johnston 2002, p. 158
- Tanaka 1980, p. 180
- Coates 1999, p. 189
- Tanaka 1980, p. 182
- Tanaka 1980, p. 184
- Tanaka 1980, p. 186
- Coulthard-Clark 1998, p. 245
- Coates 1999, pp. 164–165
- Tanaka 1980, p. 187
- Tanaka 1980, p. 188
- Keogh 1965, p. 330
- Tanaka 1980, p. 191
- Coates 1999, p. 218
- Coates 1999, p. 179
- Dexter 1961, p. 556
- Keogh 1965, pp. 328–329
- Thompson 2008, p. 380
- Dexter 1961, p. 608
- Coates 1999, p. 207
- Dexter 1961, p. 649
- Coates 1999, p. 212
- Coates 1999, p. 215
- Coates 1999, pp. 210–211
- Odgers 1968, pp. 85–87
- Dexter 1961, p. 609
- Coates 1999, p. 211
- Dexter 1961, p. 617
- Coates 1999, p. 209
- Johnston 2002, p. 167
- Coates 1999, p. 213
- Dexter 1961, p. 618
- Johnston 2002, p. 171
- Tanaka 1980, p. 192
- Dexter 1961, p. 620
- Johnston 2002, p. 173
- Dexter 1961, p. 621
- Johnston 2002, p. 174
- Johnston 2002, p. 175
- Coates 1999, p. 217
- Dexter 1961, p. 623
- Dexter 1961, p. 625
- Dexter 1961, pp. 625–626
- Dexter 1961, p. 629
- Tanaka 1980, p. 193
- Johnston 2002, p. 179
- Dexter 1961, p. 628
- Coates 1999, p. 224
- Johnston 2002, p. 178
- Tanaka 1980, p. 190
- Tanaka 1980, p. 194
- Keogh 1965, p. 331
- Dexter 1961, p. 639
- Tanaka 1980, pp. 195–196
- Dexter 1961, p. 642
- Coates 1999, p. 222
- Coates 1999, pp. 222–224
- Keogh 1965, p. 332
- Dexter 1961, p. 640
- Coates 1999, p. 225
- Coates 1999, p. 223
- Johnston 2002, p. 180
- Dexter 1961, p. 645
- Dexter 1961, p. 646
- Coates 1999, p. 226
- Dexter 1961, p. 648
- Coates 1999, p. 227
- Dexter 1961, p. 650
- Keogh 1965, pp. 332–334
- Coates 1999, p. 242
References
- Coates, John (1999). Bravery Above Blunder: The 9th Australian Division at Finschhafen, Sattelberg, and Sio. South Melbourne, Victoria: Oxford University Press. ISBN 0-19-550837-8.
- Coulthard-Clark, Chris (1998). Where Australians Fought: The Encyclopaedia of Australia's Battles (1st ed.). St Leonards, New South Wales: Allen & Unwin. ISBN 1-86448-611-2.
- Dexter, David (1961). The New Guinea Offensives. Australia in the War of 1939–1945, Series 1—Army. Volume VII (1st ed.). Canberra, Australian Capital Territory: Australian War Memorial. OCLC 2028994.
- Johnston, Mark (2002). That Magnificent 9th: An Illustrated History of the 9th Australian Division 1940–46. Crows Nest, New South Wales: Allen & Unwin. ISBN 1-74114-643-7.
- Keogh, Eustace (1965). The South West Pacific 1941–45. Melbourne, Victoria: Grayflower Productions. OCLC 7185705.
- Maitland, Gordon (1999). The Second World War and its Australian Army Battle Honours. East Roseville, New South Wales: Kangaroo Press. ISBN 0-86417-975-8.
- Odgers, George (1968) [1957]. Air War Against Japan 1943–1945. Australia in the War of 1939–1945, Series 3—Air. Volume II. Canberra: Australian War Memorial. OCLC 246580191.
- Tanaka, Kengoro (1980). Operations of the Imperial Japanese Armed Forces in the Papua New Guinea Theater During World War II. Tokyo, Japan: Japan Papua New Guinea Goodwill Society. OCLC 9206229.
- Thompson, Peter (2008). Pacific Fury: How Australia and Her Allies Defeated the Japanese Scourge. North Sydney: William Heinemann. ISBN 978-1-74166-708-0.