Battle of Bramber Bridge
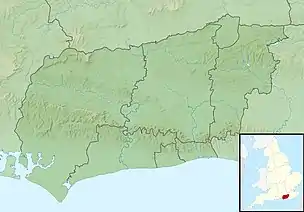
The Battle of Bramber Bridge was a minor skirmish that took place on 13 December 1643, during the First English Civil War. A Royalist detachment from Arundel attempted to secure the bridge over the River Adur at Bramber in West Sussex, but found a Parliamentarian force already in possession.
| Battle of Bramber Bridge | |||||||
|---|---|---|---|---|---|---|---|
| Part of the First English Civil War | |||||||
 The modern bridge over the River Adur at Bramber | |||||||
| |||||||
| Belligerents | |||||||
|
|
| ||||||
| Commanders and leaders | |||||||
|
Colonel Joseph Bampfield Sir William Butler |
Captain Morely Sir Michael Livesey Captain James Temple | ||||||
| Strength | |||||||
| 600 | 2,000 | ||||||
| Casualties and losses | |||||||
| 8-9 killed[1] |
1 killed 1 captured[1] | ||||||

The Royalists attempted to find another crossing point, but were ordered back to Arundel, after learning of the loss of Alton the same night.
Background

At the start of the war in August 1642, Parliamentarian forces controlled most of southern England, including the ports of Southampton and Dover, as well as the bulk of the Royal Navy. When Portsmouth surrendered to William Waller after the siege in September, they controlled every major port from Plymouth to Hull, preventing the Royalists importing arms and men from Europe.[2]
However, in 1643, the main Parliamentarian army under the Earl of Essex remained stuck in front of Oxford. On 13 July 1643, Ralph Hopton, Royalist commander in the south-west, inflicted a serious defeat on Waller's Army of the Southern Association at Roundway Down, near Devizes. The combined result was to isolate Parliamentarian garrisons in the west; on 26 July, the Royalists captured Bristol, opening a link with Ireland.[3]
At the same time, Waller's Plot in May showed many Parliamentary moderates favoured a negotiated peace. To keep up the pressure, the Royalist high command agreed to first capture Gloucester, cementing their control of the west, then move against London.[4] Hopton would simultaneously threaten London from the south by advancing into Hampshire and Sussex, potentially disrupting the Wealden iron industry, main source of armaments for the Parliamentarian forces.[5]
Lack of money, supplies, and delays in transporting the Irish troops who formed the bulk of his infantry meant Hopton was unable to move until mid October. By then, the Royalists had retreated from Gloucester, while their advance on London was checked at First Battle of Newbury on 20 September.[6]
On reaching Winchester in early November, Hopton's troops mutinied, and order was restored only after several exemplary executions. This provided Waller time to assemble a new army at Farnham Castle, composed of Trained bands from London, as well as the South-Eastern Association of Kent, Sussex and Hampshire.[7]
Hopton advanced on Farnham, but failed to tempt Waller into giving battle, and withdrew. The Royalists established winter quarters at various points in West Sussex and Hampshire, including Alresford, Alton, Petersfield and Midhurst, although his officers warned Hopton they were too far apart for mutual support. In early December, the small garrison at Arundel Castle surrendered to a Royalist force under Colonel Joseph Bampfield, and Edward Ford, former Sheriff of Sussex.[8]
Skirmish at Bramber
Leaving Ford to construct earthworks around Arundel and collect provisions, Bampfield took 400 infantry and 200 cavalry to capture Bramber and its bridge across the River Adur. Possession would control the road leading into East Sussex and Lewes, preventing an attack from that direction. He was accompanied by Sir William Butler, a Royalist appointed High Sheriff of Kent, whose property had been confiscated by Parliament.[9]

Bampfield records they marched all night but arrived at Bramber to find the bridge held by men of the Kent Trained Bands under Sir Michael Livesey and James Temple.[10] Temple was governor of nearby Bramber Castle; abandoned in the 15th century, it was not defensible, which makes it more likely he had built fortifications around the bridge.[11]
The Royalists had relied on speed and secrecy to take the bridge but were unable to assault the positions and suffered light casualties from Parliamentarian musket and cannon fire.[10][1] While searching for another place to cross, Bampfield received an urgent message from Hopton, advising him of the Battle of Alton and its loss the previous night. He was instructed to return immediately to Arundel, Waller's next target, and to send Hopton any troops he could spare.[10]
Aftermath
The Battle of Bramber Bridge was the end of military conflict in the immediate area, and probably the furthest point east a Royalist army reached in the 1643 invasion. Although parts of Kent and Surrey participated in the Second English Civil War in 1648, Sussex and Hampshire remained comparatively peaceful.[12]
The skirmish was briefly recounted almost a month later in a letter dated 8 January 1644, from John Coulton to Samuel Jeake of Rye:
The enemy attempted Bramber Bridge, but our brave Carleton and Evernden with his Dragoons and our Coll.’s horses welcomed them with drakes and musketts, sending some eight or nine men to hell (I feare), and one trooper to Arundel Castle prisoner, and one of Capt. Evernden’s Dragoons to heaven.[1]
Their perspective identifies the correspondents as Parliamentarian sympathisers, with Royalist casualties going to "hell", their own to "heaven", with one taken prisoner to Royalist-held Arundel. "Drakes" is a contemporary name for the lightweight 3-inch bore minion cannon, used as an anti-personnel weapon;[13] this indicates the Parliamentarians may have used them to defend Bramber Bridge.[1]
References
- Pavey.
- Wedgwood 1958, pp. 119–120.
- Day 2007, pp. 2–3.
- Royle 2004, p. 275.
- Wedgwood 1958, p. 281.
- Wedgwood 1958, pp. 252–254.
- Wanklyn & Jones 2005, p. 139.
- Donagan 2008.
- Lansberry 2001, pp. 7, 17.
- Bamfield 1685, p. 8.
- Baggs, Currie & Keeling 1980, pp. 200–214.
- Lyndon 1986, pp. 398-403.
- Collins, British Cannon Design 1600-1800.
Sources
- Baggs, A. P.; Currie, C. R. J.; Keeling, S. M. (1980). Hudson, T. P. (ed.). A History of the County of Sussex: Bramber, Southern Rape (part 1). VI (1997 ed.). Victoria County History. ISBN 978-0-19-722781-7.
- Bamfield, Joseph (1685). Colonel Joseph Bamfield's Apologie Written by Himself and Printed at his Desire.
- Collins, AR. "British Cannon Design 1600 - 1800". Australian Research Council. Retrieved 30 April 2020.
- Day, Jon (2007). Gloucester & Newbury 1643: The Turning Point of the Civil War. Pen & Sword Military. ISBN 978-1-84415-591-0.
- Donagan, Barbara (2008). "Ford, Sir Edward". Oxford Dictionary of National Biography (online ed.). Oxford University Press. doi:10.1093/ref:odnb/9855. (Subscription or UK public library membership required.)
- Lansberry, Frederick (2001). Government and Politics in Kent, 1640–1914. Boydell Press. ISBN 978-0-85115-586-9.
- Lyndon, Brian (1986). "THE South and the start of the Second Civil War 1648". History. 71 (233). JSTOR 24415115.
- Pavey, Philip. "Warfare in West Sussex". RH Uncovered. Mantra Magazines Ltd. Retrieved 26 April 2020.
- Royle, Trevor (2004). Civil War: The War of the Three Kingdoms 1638–1660. Brown, Little. ISBN 978-0-316-86125-0.
- Wanklyn, Frank; Jones, Robert (2005). A Military History of the English Civil War: 1642–1649. Pearson Longman. ISBN 978-0-582-77281-6.
- Wedgwood, C. V. (1958). The King's War, 1641–1647 (2001 ed.). Penguin Classics. ISBN 978-0-14-139072-7.
Bibliography
- Carlton, Charles (1992). Going to the Wars: The Experience of the British Civil Wars 1638–1651. Routledge. ISBN 978-0-415-03282-7.