69th Infantry Brigade (United Kingdom)
The 69th Infantry Brigade was an infantry brigade formation of the British Army in the Second World War. It was a Second Line Territorial Army unit and during the Battle of France it served with the 23rd (Northumbrian) Division, a division which suffered such heavy losses that it was disbanded. The brigade was included in the "order of battle" of the 50th (Northumbrian) Infantry Division, together with the 150th Infantry Brigade and the 151st Infantry Brigade, and became part of XII Corps, British home forces.[1]
| 69th Brigade 69th Infantry Brigade | |
|---|---|
| Active | 1914–1919 1939–1946 |
| Country | |
| Branch | |
| Type | Infantry |
| Size | Brigade |
| Part of | 23rd Division 23rd (Northumbrian) Division 50th (Northumbrian) Infantry Division |
| Engagements | Battle of France (1940) Battle of Gazala Second Battle of El Alamein El Agheila Mareth Line Wadi Akarit Enfidaville D Day Operation Perch Operation Market Garden |
| Insignia | |
| Identification symbol | Twin overlapping red "T T" on a black background |
It went on to fight in the North African campaign, Operation Husky, the D-Day landings and the North West Europe campaigns.
Order of Battle First World War
- 11th Battalion, Prince of Wales's Own (West Yorkshire Regiment)
- 8th Battalion, Alexandra, Princess of Wales's Own (Yorkshire Regiment)
- 9th Battalion, Alexandra, Princess of Wales's Own (Yorkshire Regiment)
- 11th Battalion, Duke of Wellington's (West Riding Regiment)
- 69th Machine Gun Company, Machine Gun Corps (formed 4 March 1916, moved to 23rd Battalion, Machine Gun Corps 1 April 1918)
- 69th Trench Mortar Battery (formed 13 June 1916)
Order of Battle Second World War
69th Infantry Brigade was constituted as follows during the war:
- 5th Battalion, East Yorkshire Regiment
- 6th Battalion, Green Howards
- 7th Battalion, Green Howards
- 69th Infantry Brigade Anti-Tank Company (formed 1 September 1940, disbanded 1 January 1941)
- 69th Infantry Brigade Support Company (from 16 May 1943, left 31 December 1943)
Commanders
The following officers commanded 69th Infantry Brigade during the war:
- Brigadier Viscount Downe
- Brigadier J.A. Barstow
- Brigadier G.W.E.J. Erskine (later C.O. British 7th Armoured Division)
- Brigadier L.L. Hassall
- Brigadier Edward Cunliffe Cooke-Collis
- Brigadier A.G.B. Stanier
North Africa
In April 1941 the 69th Brigade, as part of 50th (Northumbrian) Infantry Division, was dispatched to the Middle East first via Cyprus, Iraq, Syria, Egypt and then into Libya as part of XIII Corps in the British Eighth Army which was one of the best-known formations in the Second World War.[1]
Battle of Gazala

The "Gazala Line" was a series of occupied "boxes" each of brigade strength set out across the desert with minefields and wire watched by regular patrols between the boxes. The Free French were to the south at the Bir Hakeim box. The line was not equally staffed with a greater number of troops covering the coast leaving the south less protected.
By late May Rommel was ready. Facing him on the Gazala defences were 1st South African Division, nearest the coast, 50th (Northumbrian) Infantry Division (on their left) and 1st Free French Brigade furthest left at Bir Hakeim. The British 1st and 7th Armoured Divisions waited behind the main line as a mobile counter-attacking force while 2nd South African Division formed a garrison at Tobruk and 5th Indian Infantry Division (which had arrived in April to relieve 4th Indian Infantry Division) were held in reserve.
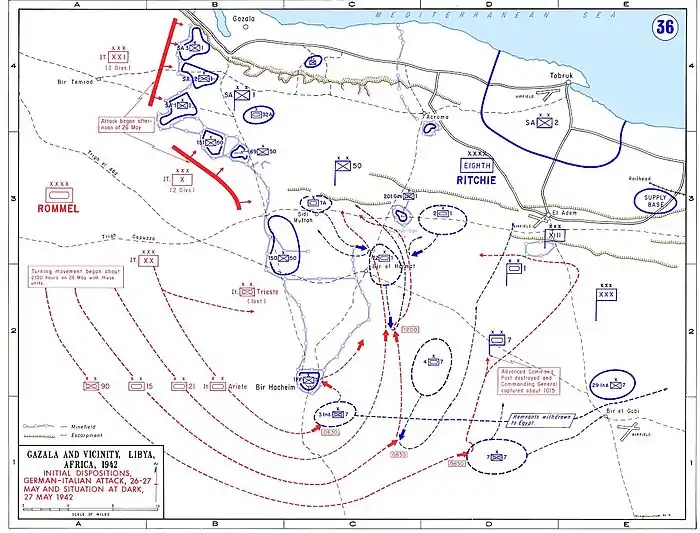
The 69th Brigade position at the start of the battle can be seen in the map (right), it was during this battle that their sister brigade the 150th Infantry Brigade was destroyed in its isolated brigade box by the Afrika Corps and never reformed. The 69th Brigade and the remaining units of 50th Northumbrian Division had to escape by attacking west through the enemy lines then sweeping back east to the south of the enemy forces, eventually they reached the El Alamein line by 1 July.[2]
El Alamein

The Battle of El Alamein is usually divided into five phases, consisting of the break-in (23–24 October), the crumbling (24–25 October), the counter (26–28 October), Operation Supercharge (1–2 November) and the breakout (3–7 November). No name is given to the period from 29 to 30 October when the battle was at a standstill.
In the 2nd Battle of El Alamein, 69th Infantry Brigade and 50th (Northumbrian) Division were initially deployed in the south (see map), where it was to attack the Italian 185th Parachute Division Folgore, supported by elements of the British 7th Armoured Division. Since the Division was understrength, owing to the loss of the 150th infantry Brigade, the 1st Free French Brigade and 1st Greek Brigade were attached to it for the battle. It was then transferred north to take part in Operation Supercharge.
Tunisia
Mareth Line

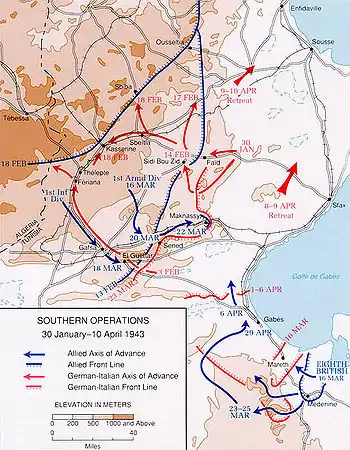
The division fought in Tunisia, where Montgomery launched his major attack, Operation Pugilist, against the Mareth Line in the night of 19 March 1943 – 20 March 1943. The 69th Infantry Brigade part of 50th (Northumbrian) Infantry Division, with difficulty, penetrated the Italian held line near Zarat. The terrain and heavy rain, however, prevented deployment of tanks and anti-tank guns and the 15th Panzer Division's counter-attack on 22 March recaptured much of the bridgehead.
Lieutenant Colonel Derek Anthony Seagrim, VC 20/21 March 1943
On 20/21 March 1943 at the Mareth Line, Tunisia, Lieutenant-Colonel Seagrim's courage and leadership led directly to the capture of an important objective. When it appeared that the attack on the position would fail owing to the intensity of the enemy fire, he placed himself at the head of his battalion and led them forward. He personally helped to place a scaling ladder over an anti-tank ditch and was the first across. Leading an attack on two machine-gun posts, he accounted for twenty of the enemy and when a counter-attack was launched next day he moved from post to post quite unperturbed, until it was defeated.
Lieutenant-Colonel Seagrim was killed in action shortly afterwards, on 6 April 1943.
Soon after, XXX Corps prepared a new attack towards Tallouf. The 4th Indian Infantry Division was detailed to make a night attack on 23 March around the left-hand end of the Line. This would coincide with the wide "left hook" manoeuver Montgomery was planning. Operation Supercharge II, "left hook" outflanking maneuver via the Tebaga Gap. Montgomery reinforced the flanking attack, which on 26 March forced an Axis retreat that was completed by 31 March with the Eighth Army in pursuit.
Gabes
Both the Eighth Army and the U.S. II Corps continued their attacks over the next week, and eventually the Eighth Army broke the lines and the DAK was forced to abandon Gabes and retreat to join the other Axis forces far to the north. On the night of 5 April, Wadi Akarit, was attacked and the "Tobruk" Battalion of the Italian San Marco Marines, was destroyed, although casualties among the 6th Green Howards had been severe; two senior officers, six senior NCO's and junior officers and one hundred and eighteen other ranks killed.[3]
"When we were about ten yards away we had reached the top of the slit trench and we killed any of the survivors," recalled British infantryman Bill Cheall of the 6th Green Howards, who had just seen his section leader shot down by a San Marco Marine. "It was no time for pussy footing, we were intoxicated with rage and had to kill them to pay for our fallen pal."[4]
German General Hans-Jürgen von Arnim later said of the San Marco Marines fighting abilities in Tunisia in 1943, that they were "the best soldiers I ever commanded".[5]
The Eighth Army's attack along the eastern coast of Tunisia, lead eventually to the surrender of Axis forces in Africa. 250,000 men were taken prisoner, a number equal to that at Stalingrad.
Operation Husky , Sicily Invasion

After Tunisia the Brigade was still part of 50th Northumbrian Infantry Division and was involved in the Sicily landings of July 1943. The latter was to operate in the eastern sector, and had as its objectives the port of Syracuse and the airfield at Pachino. Its XIII Corps, (which included 50th (Northumbrian) Division), was to land south of Cap Murro Di Porco with 5th British Infantry Division on a two-brigade front, 50th (Northumbrian) Division on a one-brigade front. XXX Corps, would operate on three sides of Passero, where the 231st Infantry Brigade, who had joined the 50th Division to replace the destroyed 150th Infantry Brigade, would advance on a one brigade front. When it landed at Avola their objective was the hills above the landing beaches.
After Sicily the Brigade and Division was then recalled from the 8th Army in Italy, on the wishes of the British Eighth Army's old Commander, General Bernard Law Montgomery, together with 7th Armoured Division and 51st (Highland) Infantry Division, to prepare for the invasion of North-West Europe.
Operation Overlord , D-Day

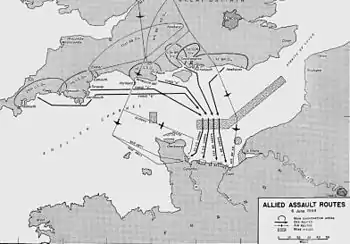
On 19 October 1943 the 69th Infantry Brigade as part of 50 Northumbrian Division was withdrawn to Britain for reforming and training before landing on Gold Beach on D-Day, 6 June 1944, together with the 151st Brigade,the 231st Infantry Brigade (previously an independent unit formed from regular troops stationed on Malta) permanently attached to the 50th Division, and the 56th Infantry Brigade temporarily attached.
Objectives
The 50th (Northumbrian) Infantry Division was to establish a beachhead between Arromanches and Ver-sur-Mer and then head south towards Route Nationale 13 linking Caen with Bayeux. The first wave is made of the 231st Infantry and 69th Infantry Brigades. Once the initial assault is over and the beachhead established, the follow-up brigades the 56th and 151st will push inland to the south-west towards RN 13 supported by the tanks of the 8th Armoured Brigade. To the west, the 47 Royal Marine Commando's mission is to capture Port-en-Bessin and link-up with U.S. forces landed on Omaha Beach. The 50th Infantry Division was also meet up with the 3rd Canadian Infantry Division coming from Juno Beach.


Gold Beach
Gold Beach was the Allied codename for the centre invasion beach during the Second World War Allied Invasion of Normandy, 6 June 1944. It lay between Omaha Beach and Juno Beach, was 8 km wide and divided into four sectors. From West to East they were How, Item, Jig, and King.
The beach was assaulted in multiple brigades of the 50th Northumbrian Division, on the West was the 231st Brigade, followed by the 56th Brigade, attached to this was a regiment of DD tanks from the Nottinghamshire Yeomanry (Sherwood Rangers), the infantry assault battalions that attacked in the West were; the 1st Battalion Hampshire Regiment, and the 1st Battalion Dorset Regiment. On the East 69th Brigade, followed by 151st Brigade, again a regiment of DD tanks was attached, they were from the 4th/7th Royal Dragoon Guards, the infantry assault battalions that attacked in the East were; the 5th Battalion East Yorkshire Regiment, and the 6th Battalion Green Howards. Their primary objective was to seize the town of Bayeux, the Caen-Bayeux road, and the port of Arromanches with the secondary objectives being to make contact with the Americans landing at Omaha Beach to the West and the Canadians landing at Juno Beach to the East. The 716th Static Infantry Division commanded by Generalleutnant Wilhelm Richter, and elements of the 1st Battalion of the German 352nd Infantry Division commanded by Generalleutnant Dietrich Kraiss, defended the Channel coast for the Germans. H-Hour for the Gold beach landing was set for 0725 hours, Company Sergeant-Major Stanley Hollis of the Green Howards was already a seasoned veteran when he landed on Gold Beach. His first action was the single handed capture of a pill box which had been bypassed by the first waves of troops. Later that day he led an assault to destroy German gun positions. For his action he was awarded the Victoria Cross. He was the only soldier to earn that medal on D-Day.
Stanley Elton Hollis VC
Stanley Elton Hollis, VC (21 September 1912 – 8 February 1972) He has the unique distinction of being awarded the only Victoria Cross awarded on D-Day (6 June 1944). On 6 June 1944 in Normandy, France, Stanley Hollis 6th Battalion Green Howards, went with his company commander to investigate two German pill-boxes which had been by-passed as the company moved inland from the beaches. He rushed forward to the first pill-box, taking all but five of the occupants prisoner and then dealt with the second, taking 26 prisoners. Then he cleared a neighbouring trench. Later that day, he led an attack on an enemy position which contained a field gun and Spandau machine guns. After withdrawing he learned that two of his men had been left behind and told Major Lofthouse, his commanding officer, " I took them in. I will try to get them out." Taking a grenade from one of his men Hollis carefully observed the enemy's pattern of behaviour and threw it at the most opportune moment. Unfortunately, he had forgotten to prime the grenade but the enemy didn't know this and kept their heads down waiting for it to explode. By the time they realised their mistake Hollis was on top of them and had shot them.
Operation Market Garden
Operation Market Garden (17 September 1944 – 25 September 1944) was an Allied military operation in the Second World War in the Netherlands and Germany.
Market
Market would employ three Airborne Divisions. The U.S. 101st Airborne Division, would drop in two locations just north of XXX Corps to take the bridges northwest of Eindhoven at Son and Veghel. The U.S. 82nd Airborne Division,would drop northeast of them to take the bridges at Grave and Nijmegen, and the 1st British Airborne Division, and the 1st Polish Parachute Brigade would drop at the extreme north end of the route, to take the road bridge at Arnhem and rail bridge at Oosterbeek.
Garden
Garden consisted primarily of XXX Corps and was spearheaded by the Guards Armoured Division, with the 43rd Wessex and 50th (Northumbrian) Infantry Division including 69th Infantry Brigade, in reserve.
17 September 1944 at 13.30 hrs the 50th Division watched as one of the largest air armadas of the war pass overhead. The division's field artillery 74th, 90th and 124th Fd Regts RA and the Mortars of Cheshire Regiment took part in the opening barrage. At 14:35 hrs the Shermans of the Irish Guards crossed the start line and despite heavy fighting reached Valkenswaard five miles (8 km) south of Eindhoven by dusk.
22 September, 69th Brigade was in trouble when two battalions of infantry and a regiment of tanks cut the main Corps centre-line near Uden, eight miles (13 km) south of the bridge at Grave. The brigade was cut in half with East Yorkshires in the north while the Green Howards where in the south.
Rations were short because of the road congestion.69th Brigade were forced to eat captured German rations which were terrible the jam tasted like rubber, the margarine was rancid and the medical officers confirmed that the meat was all bad. [1]
23 September 69th Brigade, with 124th Field Regiment Royal Artillery continued onward towards Nijmegen. They then came under the command of the Guards Armoured Division with the task of capturing Bemmel, north of the river. The 5th East Yorks achieved on 25 September, but the Germans kept them under heavy artillery fire for days.[1]
26 September the 6th Green Howards were ordered to occupy Haalderen, but ran into opposition, and failed to capture their objective. The 69th Brigade now attacked in the direction of Haalderen continued throughout 27 September. During the day the East Yorks gained some ground as they were supported by a quick barrage.
The airborne troops farther north at Arnhem had by now been withdrawn. The attempt to reach them by land had clearly failed, and attempts to supply them by air had been only partially successful. Thus the final objective of Operation "Market Garden" Arnhem and the crossing of the Rhine defences had not been achieved.[1]
30 September All of 50th Division was tasked with guarding the bridge and bridgehead north of Nijmegen called the Island. The first German counterattack came when seventy tanks and the equivalent of an infantry division was unleashed on the division. 69th Brigade and the 5th Guards Brigade were holding the line, while another attack was put in against 43rd Division across the Nederrijn.
The intensity of the attack on the 69th Brigade and their defence can be judged by the fact that 124th Field Regiment RA fired a total of 12,500 25-pound shells during the action and 'B' Company of 2nd Cheshires fired 95,000 rounds of medium-machine-gun fire.[1]
References
- "route to victory". Archived from the original on 5 August 2016.
- "general ramsden". Archived from the original on 17 May 2007.
- "bill cheal". Archived from the original on 11 October 2007.
- "bill cheal". Archived from the original on 12 June 2008.
- "italy marines".